Constructing a Knife the Low-Cost Approach Part 3
Okay ladies and gentlemen, this here is the third and final installment of my low cost knife making tutorial. The first part can be viewed here, while the second part can be accessed right here. In the previous installment, we ended this fun and informative tutorial at “step number ten.” So, let us begin with step number eleven!
Step Number Eleven
Step Number Eleven
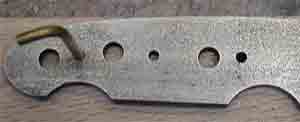
After initiating file test, what you’re going to have in your hands is a knife that’s really hard. Now, you do not want the blade to be this hard. So what you want to do next is get that hardness drawn out. Not draw it out completely though. Just a portion of that hardness needs to be drawn out in order to keep the knife from possessing an edge that’s brittle as well as point. So we begin the drawing out process by preheating a kitchen stove. It should be preheated to approximately 400 degrees Fahrenheit.
Set the rack in position, and simply put the blade on it. Go ahead and do something else while you wait for the blade to be baked on the kitchen stove. Baking time should take about 40 to 50 minutes. After the baking process is done, allow the blade to cool for a brief period of time. Next, you repeat the baking process for yet another 40 to 50 minutes. Use the same temperature for second round of baking.
Once the second round of baking period is up, we are ready to give the knife some real good cleaning. The next process involves sanding which is a bit tedious, but necessary – of course. After sanding, we can attach the handle! Okay, on to step twelve.
Step Number Twelve
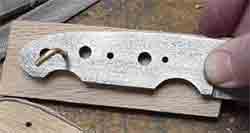
First thing you should do is place the knife handle on the table. Make sure it is well positioned on the table, and then place the knife directly on the handle. Next, you need to construct the slabs. This is very easy to do. Simply slice off a couple of pieces and the slabs are done! Now, let’s focus on the edge of the knife. You see, one or two edges of the knife tend to end up getting the lion share’s of the filing. Obviously, we want to avoid this.
Our goal is to achieve filling balance on every edge of the knife. So in order to accomplish this, you need to position the knife closer to the upper edge of the handle. Be sure to position it as close as you possibly can.
Our goal is to achieve filling balance on every edge of the knife. So in order to accomplish this, you need to position the knife closer to the upper edge of the handle. Be sure to position it as close as you possibly can.

Cut off the brass pin material. Make sure you have three brass pins on hand. Don’t forget to drill three holes so we can insert the brass pins through. Once you have inserted the pins, create a mark that depicts the shape of the blade on the oak slab.

Step Number Thirteen
File the left side of the slab. Next, work on the front portion by sanding it thoroughly. This process must be done precisely because you won’t be able to make any adjustments once the knife has applied with epoxy.
File the left side of the slab. Next, work on the front portion by sanding it thoroughly. This process must be done precisely because you won’t be able to make any adjustments once the knife has applied with epoxy.
Use a pencil to create the outline of the blade. Work your way from the left side of the oak slab all the way to the right.
The goal here is to get identical outlines of the blade on both sides of the oak slab. So just go ahead and match up the slabs. If the outlines do not match one another, then you need to keep on sanding and filing the oak slab.
Step Number Fourteen
Once you’ve reached this step, you should have in front of you, a couple of slabs that are real flat. Also, there shouldn’t be any gaps existing in the middle of the slab. Okay in this step, we want to degrease the knife. This process is simple enough. You need hot water, soap and a toothbrush. Apply some soap on the tooth and brush the blade thoroughly. Next, rinse the blade with hot water and then wipe it real dry. Make sure it is COMPLETELY DRY. This is very important! Use a hair dryer if need be.
Step Number Fifteen
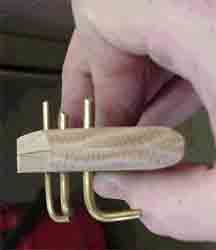
Alright guys, this is the final step! So, the pin material has been cut. Now, you got to smoothen some of those rough edges. Just keep on sanding them. The rough edges require smoothening because they tend to produce splinters as soon as you insert the pins. The slabs’ interior portion has to be covered with some transparent epoxy. Next, you put those slabs on the blade.
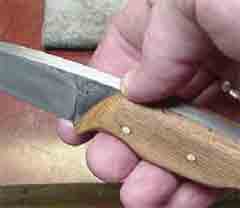
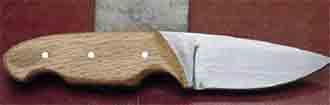
Make sure the slabs are properly positioned. Get the positioning right first, and then you can go ahead and insert those pins through the three holes you drilled earlier. Now wrap it all up with a handful of really tough rubber bands. Okay, we’re DONE here folks! We made a functional and pretty awesome looking knife on our own using a very inexpensive approach. Check out the knife I made…Awesome eh?
The goal here is to get identical outlines of the blade on both sides of the oak slab. So just go ahead and match up the slabs. If the outlines do not match one another, then you need to keep on sanding and filing the oak slab.
Step Number Fourteen
Once you’ve reached this step, you should have in front of you, a couple of slabs that are real flat. Also, there shouldn’t be any gaps existing in the middle of the slab. Okay in this step, we want to degrease the knife. This process is simple enough. You need hot water, soap and a toothbrush. Apply some soap on the tooth and brush the blade thoroughly. Next, rinse the blade with hot water and then wipe it real dry. Make sure it is COMPLETELY DRY. This is very important! Use a hair dryer if need be.
Step Number Fifteen
Alright guys, this is the final step! So, the pin material has been cut. Now, you got to smoothen some of those rough edges. Just keep on sanding them. The rough edges require smoothening because they tend to produce splinters as soon as you insert the pins. The slabs’ interior portion has to be covered with some transparent epoxy. Next, you put those slabs on the blade.
Make sure the slabs are properly positioned. Get the positioning right first, and then you can go ahead and insert those pins through the three holes you drilled earlier. Now wrap it all up with a handful of really tough rubber bands. Okay, we’re DONE here folks! We made a functional and pretty awesome looking knife on our own using a very inexpensive approach. Check out the knife I made…Awesome eh?
This is the end of our 3 part series tutorial on making a knife on a budget. Hope you enjoy the experience and I wish you the best of luck in your knife making endeavor!
