How to Use a Whetstone to Sharpen a Dull Knife
I got to admit, I have a tremendous passion for cooking. For me, the most fun part of cooking is the preparation phase. It’s so much fun to gather the ingredients, and then chopping, cutting, dicing, slicing, and blending them. Of course, it’s a lot of fun if you have a really sharp knife at your disposal. Without a sharp knife to help you do all the cutting and chopping, you’re going to struggle and the preparation stage which is supposed to be fun, becomes a nightmare!
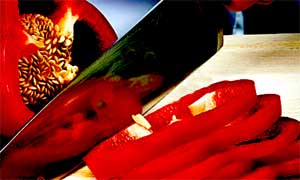
It’s no fun sawing away at a block of meat with a lackluster kitchen knife. I’ve been through such experience before and it was a huge pain in the butt. On the other hand, cutting meats and vegetables with a razor-sharp kitchen knife gives me a pretty awesome feeling.
Another task that provides me with an awesome feeling is sharpening a knife. Yes, sharpening a knife can be a rather time-consuming affair, but I like it a lot. I find the process of sharpening a dull knife using a whetstone to be absolutely pleasing and therapeutic. Yes, I’m somewhat of an oddball, but what can I say, the heart likes what the heart likes.
Anyway folks, I would like to share my special samurai tips and tactics for sharpening a dull knife with a whetstone.
Utilizing the Whetstone
First, you’ll need a decent quality whetstone. From my experience using a wide array of whetstones in the past, the Japanese whetstones without a doubt, offer the best overall experience and results. The one I currently have in my kitchen consist of two separates stones, but they are stacked against each other like a sandwich.
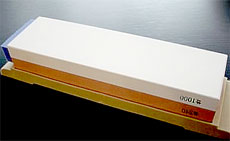
Japanese whetstones are best
One side is rough with a grade of 240, while the other side which is the fine side has a grade of 1000. It’s vital that you soak your stone in water for approximately ten minutes. The reason for doing so is to ensure that the action of metal on stone is optimally lubricated. And for your info, soaking the stone in oil is necessary in some cases.
After soaking, place the knife’s blade against the top surface of the whetstone. You should proceed initially on the rough portion of the stone, and then you just move the blade backward and forward against the rough surface.
Getting the right sharpening angle is absolutely crucial and it is achieved by positioning the blade on the stone at the angle of the edge. Now, I’m well aware that many people out there have a hard time sharpening a Global knife. I used to have a little bit of trouble sharpening it as well.
global-kitchen-knife
This is due to the fact that the blade of a Global knife curves in the direction of the edge, thus it’s a little difficult to determine its ideal sharpening angle. The vast majority of knives however, possess a bevel edge with an angle that’s somewhat unique. As a result, determining the sharpening angle of a bevel edge knife is much easier that a Global knife.
Clip-On to the Rescue!
A clip-on is super helpful for inexperienced whetstone users who find it hard to ascertain the proper sharpening angle. Go to a large departmental store and check out the home & kitchen section. I’m sure you’ll be able to find a handy little clip-on guide in that section. It’s a very useful device to help beginners obtain the right angle when sharpening a knife with a whetstone.
Keep using the clip-on guide until you’ve gotten the hang of using a whetstone. With sufficent practice, you’ll eventually be able to set the correct sharpening angle on your own without having to rely on the clip-on guide.
A Heads-Up When Using a Clip-On Guide during Sharpening
In my early days using a whetstone, I used a clip-on guide exclusively. It was really helpful, but you have to be careful though…You see, the problem with using a clip-on is that it’s prone to amassing slurry and other particles. These things would congregate under the guide, mind you! If you don’t rinse the guide before removing it from the knife, the grit will end up scoring the both sides of your precious knife.
So the takeaway here is to rinse the guide as rigorously as possible before taking it off your blade.
