The Must-Know Fundamentals of Sharpening a Dull Knife
The knife that we own is probably one of the most significant tools you could possibly ever take for granted. Your blade is on you almost all the time and you most probably draw it out for performing more duties than you even realize. However, all the work you put your knife through can begin to take a toll on its edge. Therefore, if you are not maintaining it on a frequent basis, you’re actually putting yourself at a risk each time you make use of it.
A number of folks mentioned to me that they actually do not mind using a knife with dull edge, due to the fact that a sharp knife seems a little more frightening to them! Well, that is just wrong because if you think about it, a dull knife is really considerably more hazardous.
For starters, you have to work with much more effort in order to produce a cut, meaning that eventually when you do slice through whatever it is you wish to cut up, you’re utilizing tremendous pressure that your knife carries on being in motion at a rate you are unable to control. As a result, you run a huge risk of getting yourself cut or another person near you.
In addition, if you’re cutting a surface that’s curved, smooth, or wet, the possibility of a dull knife slipping is much higher. Finally, if you cut yourself with a dull knife, considerable tissue damage can occur quite easily as opposed to a sharp knife, which is likely to produce only little or even no tissue damage at all. Yes, the cut may be deeper potentially, although with clean edges, the healing process is likely to be far more desirable. Keeping your knife sharp is critical not just for safety reasons, but also to ensure your workflow goes smoothly.
Grind Angles
Prior to commencing your sharpening task, it’s vital that you be aware of the fundamentals of the various edge-bevel angles in addition to their functions. Never assume that all knives are constructed similarly as they were crafted with distinctive functions in mind, and the angle of the edge grind (edge bevel) is essential to its purpose. For example, a narrower angle, such as 15 to 22 degrees, offers an extremely keen edge which induces slicing quality that’s truly exceptional. An angle that's broader, such as 27 to 30 degrees, is common for a heavy-duty, big-sized “chopper”, which is often required for executing tasks that are more challenging.
Normally, a decently crafted bushcraft knife will have a grind of approximately 22 to 27 degrees, delivering a superb medium for more robust camp tasks, along with offering a keener edge for processing food as well as other slicing chores. If you do not intend to reprofile the edge on your knife, this post is just a quick guide to assist you in comprehending that the angle of your edge bevel has a purpose, plus the importance of being attentive to the angle when you’re sharpening your blade.
It’s beneficial to keep up a constant grind during the entire sharpening procedure in order to achieve an edge that functions excellently, while eliminating frustration in the process.
How to Determine the Factory Grind Angle
If you utilize a sharpening stone, it isn’t imperative that you have knowledge of the specific angle value of the grind on your knife. That being said, it is essential that you get a sense of it, because you want to be able to maintain the proper angle throughout the sharpening process. It is fine to use a sharpening system, but do bear in mind that the angle value is a bit more significant, so setting the guides correctly is a must every time you sharpen your knife.
In order to pinpoint the factory angle, all you have to do is grab a permanent marker and use it to color only the edge portion of your knife (for aesthetic reasons, do your best to avoid getting off the edge shoulder). If a sharpening system is employed, you need to fix the guides at the nearest angle you sense is best. Once you’ve figured that out, simply run it through just one time using a finer grit stone or belt.
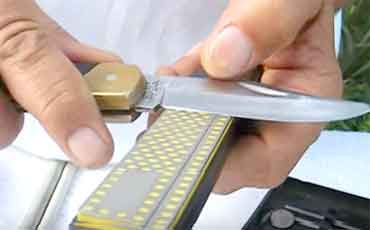
You will have the correct angle once the whole marking is gone. However, if half of the marking still remains – whether upper or lower, doesn’t matter - your guides need to be altered appropriately until the whole marking is removed in an even fashion. If you prefer sharpening the knife with a stone or diamond plate, make use of your thumb or middle finger as a guide for the correct angle. This can be achieved by placing your fingers on the sharpening surface, and laying the side of the blade on your middle finger to serve as an angle guide. (The middle finger is my personal preference as it provides me with a superior hold on my sharpening stone with a natural position.)
As with electric knife sharpeners, if the entire marking gets taken off after completing the initial pass, it means you got the angle right! Carry on sharpening your knife. If marking is still present, then make the necessary modifications to your angle until the right one is attained. A great deal of practice, patience and persistence is necessary when it comes to hand sharpening, but once you’ve mastered this skill, it can provide a tremendous source of pride and enjoyment.
In order to pinpoint the factory angle, all you have to do is grab a permanent marker and use it to color only the edge portion of your knife (for aesthetic reasons, do your best to avoid getting off the edge shoulder). If a sharpening system is employed, you need to fix the guides at the nearest angle you sense is best. Once you’ve figured that out, simply run it through just one time using a finer grit stone or belt.
You will have the correct angle once the whole marking is gone. However, if half of the marking still remains – whether upper or lower, doesn’t matter - your guides need to be altered appropriately until the whole marking is removed in an even fashion. If you prefer sharpening the knife with a stone or diamond plate, make use of your thumb or middle finger as a guide for the correct angle. This can be achieved by placing your fingers on the sharpening surface, and laying the side of the blade on your middle finger to serve as an angle guide. (The middle finger is my personal preference as it provides me with a superior hold on my sharpening stone with a natural position.)
As with electric knife sharpeners, if the entire marking gets taken off after completing the initial pass, it means you got the angle right! Carry on sharpening your knife. If marking is still present, then make the necessary modifications to your angle until the right one is attained. A great deal of practice, patience and persistence is necessary when it comes to hand sharpening, but once you’ve mastered this skill, it can provide a tremendous source of pride and enjoyment.
